Penguin Igloo Cake

Mr Steves has a fondness for penguins, a love of chocolate and a dislike for fondant. Hence a chocolatey penguin birthday cake where fondant only makes an appearance to cover the cake board and make the penguins features.


One of my favourite cakes to make and I'm sure it had nothing to do with all the left over marshmallows and chocolate ;)

I used a ball tin to bake the igloo, then covered it with white chocolate buttercream and added marshmallows one by one (one for the cake... one for me... one for the cake... one for me...) to make the icy bricks. 

The doorway was a bit of an after thought so sadly the penguins can't enter their tasty home.

The penguins themselves are cake pops and as my Owls have proved so popular, this time I decided to photograph how I make them....


The first step is to bake and crumble a cake.

I use a recipe for 12 cupcakes to bake a small sheet cake and this usually makes around 18 cake pops. 

To crumble, break the cake in to large pieces and rub them together.

When the cake is crumbled add buttercream icing one spoon at a time and use the back of the spoon to mix it in. It doesn't need a lot of icing, I find 1 1/2 - 2 spoonfuls usually does the trick.

When you have the right consistency the cake should stick together and mould easily. 


Take a little bit of mixture at a time and roll it into a ball. I use a tablespoon to scoop out roughly equally measures. Then place the balls in to the freezer for roughly 10 minutes to harden.

Remove the balls from the freezer and at this point you can stick with the ball shape, or remould them to your desired shape and place them back in to the freezer to harden again. For my penguins I remoulded them in to more of an oblong shape. 

Next is the fun bit. Melt your chocolate and start dipping :) 


At this point you would normally add a lolly pop stick but as I didn't need them I used fondue forks. To attach lolly pop sticks, dip the top of the stick in to the chocolate, then insert it gently in to the cake pop no more then half way. Do this for all your cake pops and by the time you come back to the first one it should have set.


Holding the lolly pop stick, dip the cake pop in to the melted chocolate until it is covered. Then lift it out and very gently tap to remove any excess chocolate. Don't be tempted to stir the cake pop in the chocolate as you may lose it from the stick. If your bowl is not deep enough to fully submerge the cake pop use a spoon to help cover it.

To create my penguins, I dipped them in white chocolate, then dipped the top and sides in milk chocolate once they had set.


For regular cake pops, I would add sprinkles and decorations while the chocolate is still wet. For my penguins I prefer to let the chocolate set before adding their features, otherwise they slide out of position and my penguins end up with wonky eyes and beaks by their feet.

I made their features out of fondant. To add them after the chocolate was set I used a cocktail stick to place a tiny spot of chocolate where needed which acted as my glue.

And that's it! I added butterfly decorations as bow ties, although Mr Chris questioned if penguins eat butterflies so perhaps they didn't have the desired effect. 

Don't be put off by the number of steps involved. Cake pops are easy and fun to make if you have the time. I learnt this technique flicking between videos by DessertDecorating and Bakerella so check them out if you want to see it in action.

Mr and Mrs Pointer

Many months ago my sister and I were talking cakes when she casually asked how much notice I need to make one. Completely oblivious to her sneakiness, I said maybe a week or two providing I have nothing on. So two weeks before the 3rd of January she asked if I would bake her a cake..... a wedding cake!!!

The 3rd of January last year was an entirely different and very difficult day. This year my sister and Steves wanted to start on a positive note by making it a special and happy day to remember, however they kept their plans to themselves. 

It came as quite a shock to family and friends, including my Dad, who arrived thinking they were going out for a meal but discovered they had been gathered for a wedding. After the initial cheer there was panic as friends debated if they had enough time to run in to town for a pretty dress, and uncles desperately borrowed from Steve's assortment of ghastly ties. Of course neither was necessary, but I am glad I got a little heads up due to my cake making skills. My only other duty was to ensure my Dad wore the new shirt and tie he had received for Christmas and thankfully he got the hint. 


To say this cake was stressful would have been an understatement! It had to be perfect and although it didn't compare to how beautiful my sister looked on the day, it was good enough for the restaurants manager to ask if I was looking for more work.

Once again I owe thanks to my mentor from afar, Krazy Kool Cakes, who had impeccable timing and posted a tutorial on How to Dam & Crumb Coat Cakes. Finally I know what causes that little bulge in my fondant where the cakes are sandwiched together and once again I can be generous with my fillings :)


One thing I couldn't find online was how to create the centre spray (probably because it really is that easy) but for anyone else looking, this is how I did it....


1. Cut shapes from thinly rolled gumpaste (I use fondant with added Tylo powder). Thin enough to look delicate and be light but thick enough to insert the wire.
I used an impression mat on one half of my fondant to give some butterflies texture and make them look more interesting.

2. Carefully insert wire in to the middle of the shape. Lightly pinch either side and guide the wire in so you can feel if it is getting to close to the surface. If you dip the end of the wire in a little water, it'll also help it to stick.


3. To give my butterflies shape, I lightly folded their wings and rested them in a left over Christmas card to harden overnight. You could use anything for this. I used the insert of a cupcake box for my other butterflies.


4. Get your hands on a posey pick and place a little piece of rolled up fondant inside to keep the wires in place.

5. Start adding the decorations. Cut the wires to different lengths and arrange until you're happy with how they look, then finally insert the spray in to the cake. 


Thank you to Think Cake in Maidstone who pointed me in the right direction on this one. If you live in my area I can highly recommend them, they stock everything you need, are very welcoming and happy to talk cakes and share their know how.


Despite a few drinks we managed to cut reasonable slices for the guests and I was pleased to find the top tier alone, a 7 inch madeira sponge, gave 21 slices. Harry had the right idea as he was first in line for his.


All that's left to say is how happy Chris and I were to share this special day with my sister and Mr Steves. It was a lovely day.


To Charlene & Steve,
You are great together and we wish you every happiness for the future, praying that all your dreams come true. Steve, thank you for making my sister so happy and taking good care of her. I love you both very much and I'm pleased to have you as my official brother-in-law (of course I will deny this if you ever mention it).
xxx


Princess Castle Cake

After Miss Connie Jean requested a Princess castle cake for her 5th birthday I feared she was starting to over estimate my baking skills, but perhaps she has more confidence in them then I do...

And maybe I cheated a little...

Originally I wanted to bake the turrets but as I lost track of what day it was over the Christmas period, I didn't leave myself enough time. The turrets are actually kitchen roll tubes covered in fondant. Not edible but quick, easy and they get the job done! I read somewhere that cakes can be baked in food tins so if you're making a castle cake and you would like edible turrets, maybe that's something to look in to?

The tops of my turrets are ice cream cones dipped in pink candy melts and covered with sprinkles (a whole pot of sprinkles). South Park shot glasses came in handy when leaving them to dry. I used the same glasses to squash the top of the kitchen roll allowing the cones to sit snugly, secured in place with a little buttercream. I was wise enough to make more cones then needed as two crumbled in the process.


A castle has to be high! This cake is three layers of madeira sponge sandwiched together with pink buttercream icing and jam. This is it with its pink crumb coat. For anyone unfamiliar with cake terms as I once was, the crumb coat is a very thin layer of icing that traps any loose crumbs, and helps to give a smooth surface before the applying the final layer of icing or fondant.


The slices were generous but expertly cut by Nanny Maggie one slice served two people. 


Ideally, I would have liked to add more finishing touches such as flags and a princess but I ran out of time. Nevertheless it got Connie's seal of approval and that's all that matters :)


Lottie, forever in our hearts xx

Charlotte Roses
We think about you always,
we talk about you still,
you have never been forgotten,
and you never will.
We hold you close within our hearts,
and there you will remain,
to walk with us throughout our lives
until we meet again.

Animal Safari Cake

When my friend and colleague, Azra, asked if I could make a birthday cake for her little boys 5th birthday party I was happy to oblige. When she went on to say she would need at least 30 slices from the cake and 30 cupcakes to accompany it, I have to admit I thought I'd bitten off more then I could chew.


Fortunately the cake was a success and probably my best to date!


As most of my cakes are gifts I've never had to worry about portions before, so the first thing I did was find out how many slices my usual 8 inch round cake provides.

Our friend Verity advised they got around 25 slices from Harry's 1st birthday cake, cutting it in to rectangular pieces like a wedding cake. This seemed to fit in with Wilton's serving guide and so I decided to follow that. 

I didn't want one large cake so I thought I'd attempt my first ever tiered cake. Using Wilton's guide I decided to go with a 6 and an 8 inch cake, until I got nervous about portions and the lady in the cake shop suggested I go with a 7 and 10 inch cake. 

It proved to be more then enough as all of the children and their parents got a reasonably sized slice, and they still had half of the bottom tier left at the end.


Stacking the cakes was a nerve racking experience but not as terrifying as I thought. There are numerous tutorials on YouTube, each one varies slightly and different people favour different types of supports. I opted for plastic dowels and pretty much followed this tutorial, placing four in my bottom tier. The cake felt sturdy and was delivered to it's destination with no dramas.


With an animal safari theme for his party, I created lots of little animal friends to match Ben's party invitation. These little critters took some time but were my favourite part of the cake and lots of fun to make.

I must point out the inspiration behind this cake comes from Krazy Kool Cakes in El Paso, Texas. They made an animal safari cake back in 2011. It was exactly what I had in mind for Ben's cake and when I saw it I knew I had to recreate it. If you haven't seen their work check them out on Facebook or YouTube. They're a family run business, their cakes are amazing and they always take time to reply to their fans! They're also very happy to share their expertise and often post helpful tutorials online.


As for the cupcakes, I managed to whip up 12 vanilla cupcakes, 12 chocolate cupcakes and 10 banana cupcakes to accompany the cake.

I created animal faces on the vanilla cupcakes but short on time I cheated with the others and added printed rice paper toppers. Not everyone is keen on fondant so at least it gave a good selection.


I'm very proud of this cake and even Laura from Krazy Kool Cakes gave it a big thumbs up. I hear it was a resounding success at the party and Ben had a really great day.

Captain Hog

This little fella was created for our brother-in-law Steve, to celebrate his birthday. 

Why a hedgehog? Well if you know Steve you should know why.

I gave him a moustache because he is a distinguished gentlehog, and he likes to stand out amongst his hedgehog friends (Mr Chris thinks I'm crazy too).

This is the first time I have made the effort to also decorate the cake board. I'm starting to see how those finishing touches help to complete the cake and tie it all together.


Covering the cake board

I'm not sure if there is a correct way to cover a cake board but this is how I achieved it....

1. I rubbed a thin layer of Trex all over the board to give it something to stick to.
2. Rolled the fondant to the size needed, placed a rolling pin in the middle, then folded the fondant in half over the rolling pin.
3. Slid the board in to place up to the rolling pin, then lifted the fondant, placing the rolling pin in to the centre of the board.
4. Unfolded the fondant and smoothed the surface on to the board with a smoothing tool.
5. Carefully cut around the edge of the board with a sharp knife to remove the excess fondant.
I would recommend covering the cake board the night before so the fondant has time to harden and does not mark so easily.

Also, I used to place my cakes on to the final board before icing and decorating them, but when the board is covered it's not possible to do this. The cake will need to be iced and covered separately then transferred to the board. I can recommend the Wilton cake lifter which makes this process a little easier. Again if you cover a cake in fondant, leave it to harden before transferring it to the board to avoid marking it. I never leave myself enough time to do this so I'm just extra careful. If I do make a mark in the fondant I carefully place my decorations to hide it ;)


Carving the hedgehog

In future I'll try to get progress photos to accompany my cakes but for now I'll have to describe how to create Mr Hog as best as I can...

1. Start with an 8 inch round chocolate sandwich cake. The 2 layers help to give the hedgehogs body some height. 

2. Carve opposite sides off of the cake to create more of an oval shape that's fatter at one end. The fatter end will become the hedgehogs body, and the thinner end his head. Cut small pieces at a time to avoid cutting away too much.

3. At the thinner end, on the top of the cake approximately a third of the way in, start carving down to where the layers join to create a gradual slope. This will start to form the hedgehogs head.

4. Use the offcuts of cake from step 2 to shape a nose and attach this with some buttercream to the hedgehogs head. If you look at the picture, the cake past the hedgehogs eyes is created from offcuts. The cake above his eyes was shaped in steps 2 and 3.

Decorating the hedgehog

1. Cover the carved cake with a good layer of chocolate buttercream. 
Use brown or chocolate fondant to cover the head and nose. 

2. Use a sharp knife to cut chocolate flakes and push them in to the buttercream on the body to create spines. Note: This will use a lot of chocolate flakes, hence my spines are quite short. Also some flakes will simply crumble as you chop them so expect left overs. I kept these and used them to sprinkle on cupcakes another day. It may be easier to chill the flakes before attempting to cut them?

3. Use fondant to create your hedgehogs features and moustache if desired :) I used a small piece of spaghetti to help keep his nose attached.

I hope this helps if you want to create your own hedgehog cake and good luck!

    Cookie Date

    Following on from the Cake and Bake show, I met up with my sister and Verity for a cookie date to put our newly acquired knowledge in to practise. Not wanting to miss out on cookies, Mr Chris tagged along and even had a go himself.


    Rachel's recipe produced a huge number of cookies giving us plenty to practise on. 

    I can't take any credit for the baking as Verity was chief baker, but the cookies tasted great. They had a nice buttery flavour with a slight hint of vanilla, a nice crispy edge and a crumbly centre. I have a weakness for biccies so mine didn't last long at all. 

    We used the "flooding" technique to cover our cookies. With this technique you use a slightly firmer icing to pipe a dam around the outline of the cookie, and then a runnier consistency to fill it in.

    When piping the outline Rachel taught us to lift the icing bag away from the cookie and let the icing just fall on to it. This really helps but still requires some practise. We used a #1 tip for the outline but it was very fine. I'd probably try a #2 tip next time.

    After piping the outline wait at least 15 minutes for it to dry before "flooding" the cookie. For this we used a #4 tip. Fill the inside of the cookie, then give it a gentle shake to help smooth the surface. You can use a cocktail stick to help fill any gaps. 

    At this point you can add more colours if you want them to sit together, or wait for the surface to dry and then pipe on top.

    Can you spot Mr Chris' cookie? :)
    Rachel's cookie recipe:
    400g Flour
    200g Butter
    200g Sugar
    1 Egg
    1 tsp Vanilla Essence

    Beat together the butter and sugar. Add the egg and vanilla essence and combine, then gradually add the flour. Chill the dough for 15 minutes before rolling it out and cutting shapes. Cook at 170 degrees for 10 minutes until lightly golden.

    Royal Icing recipe:
    250g Icing Sugar
    1 Egg White
    1 tsp lemon juice

    Whisk the egg white until it begins to froth, gradually add the icing sugar followed by the lemon juice.

    In the past I have struggled to get the right consistency with Royal Icing, switching back and forth between adding more water, then adding more icing sugar. Rachel gave us a few tips to help us get it right:

    • It is harder to thicken icing by adding more icing sugar then it is to thin it. It is also very easy to add too much water so add a light misting of water at a time by using a spray bottle.
    • The 10 second rule - To check the consistency of your icing, dip a spoon in to it and then lift it out allowing ribbons of icing to fall back in to the bowl. If the icing is the right consistency the surface of the icing should become smooth again in 5-10 seconds.
    • If the icing is too thick it will curl back over the icing tip when trying to pipe it.

    Take a look at this tutorial on Sweetopia for some excellent step by step instructions and techniques for decorating cookies. I love these beautiful butterfly cookies, I think I'll have to try them myself some time.

    Key Lime Pie

    If you've been enjoying "The Great British Bake Off" on BBC2 as much as me, you'll probably recall Ryan Chong's amazing key lime pie. This pie was so great Ryan won "Star Baker" for that episode and the judges, Mary Berry and Paul Hollywood, described it as one of the best things they'd tasted in all three series of the Bake Off.

    Watching it we had one of those moments when Mr Chris and I share the exact same thought... We must make Key Lime Pie!

    And so we did...

    Putting Mr Chris' gift to good use, I found a recipe in "Mary Berry's Baking Bible". This was really easy to make and actually required no baking so you can't really go wrong.

    It's a very tasty, light and refreshing dessert. We shared it with a few friends and it went down well. As nice as it was, I still need to give Ryan's recipe a go but at least now we have something to compare it too. I think Mr Chris is particularly keen as he went out and bought me the Bake Off recipe book containing Ryan's recipe: "The Great British Bake Off: How to turn everyday bakes into showstoppers". I think Ryan's version will have to wait until I have some more free time but if you want to give it a go you can find the recipe on the BBC Website. Enjoy!

    The Cake and Bake Show

    The Cake and Bake show was a two day event held at London's Earls Court. Apparently over 21,000 people attended during the two days and I can certainly believe that. I went along with my sister and our friend Verity and it was jam packed!

    The first thing we stumbled across was the "Edible Beach" competition.

    These were some of my favourite entries.
    My poor photography doesn't do them justice but the attention to detail is incredible, I can't imagine how many hours must have been spent perfecting them.

    I'm afraid my cakes would look pitiful in comparison but watch this space as I'm still learning.

    Taking the opportunity to learn some new skills at the show, we joined a couple of the classrooms on offer. There were so many it was difficult to choose between them but as each class was an additional £5, we had to be selective

    On a side note, I was gutted to find out Lindy had joined the show after I'd already booked my tickets :(


    Rachel Hill from Rachelles
    The first classroom we joined was "Hand Decorated Cookies" with Rachel Hill of Rachelles

    Rachel shared her recipe for perfect cookies and demonstrated how to pipe and "flood" with royal icing. She gave us some great tips such as the 10 second rule for checking your icing consistency, and using a spray bottle to thin the icing. She also showed us several techniques to decorate cookies including icing lace and embroidery patterns.

    Icing cookies is a first for me, so I'm looking forward to a future baking date with my sister and Verity to put our newly acquired knowledge in to practise.

    Laura Edwards from Mamma Jamma Cakes


    The other classroom we opted for was "Cake Sculpture" with Laura Edwards of Mamma Jamma Cakes.

    Starting with a 10" (or possibly a 12") round Madeira cake, I was amazed at what she turned it in to.

    Laura demonstrated how to make this Koi Carp fish, sculpting, covering, decorating, and air brushing it all within half an hour!


    In this picture, the cake on the left is the one from the show, the one on the right is the one above, the "and here's one I made earlier" one.

    I actually got to try the Dinkydoodle airbrush at the show. I did really like it but I don't think it's for me at this moment as my cakes are mostly one block colour. I imagine it'd need some practise to be able to get an even coat with the airbrush, also I'm too impatient to let it dry and I don't really have a space I can airbrush in. It could be a purchase for the future if my cakes become a little more elaborate :)


    My favourite part of the show without a doubt was star speaker Mary Berry. I'm a huge Mary Berry fan. I love her recipes and I love The Great British Bake Off.

    When I discovered she would be doing book signings, Mr Chris very kindly bought me "Mary Berry's Baking Bible" to get signed. Unfortunately I missed out as we were in one of our classes at the time she was signing, but I can't wait to try some more Mary Berry recipes. Expect to see some on here shortly :)

    Whilst sharing funny stories and tales from GBBO, Mary whipped up a Hazelnut Meringue Roulade and the hugest Chocolate sponge cake. Both looked delicious, I was only sad I couldn't get anywhere near the front to pinch a bit.

    Mary Berry in action

    The Cake and Bake Show returns again next year but I'm not sure if I'll go back yet. Whilst I really enjoyed the classrooms and demos I felt the event was far too crowded. Most of the items on sale were overly priced, or at least I know I can get them cheaper on line, and there was a distinct lack of freebies. Whatever happened to the freebie? I remember when one of the perks of going to a show was all the freebies you would collect on your way round. So come on the Cake and Bake Show, when you return next year... more freebies :D

    Ba-da ba-da ba-da-da-boo

    Today is the last hair cut I'll have for a while as my hairdresser is off to start her maternity leave. No one else can tame my hair like she can and so I have to wait until she comes back. 

    I knew this day was coming and although I had all morning, I, in classic Cheryl style, opted to sleep in and leave myself less then 60 minutes to make these. 

    With the countdown tune stuck on repeat in my head, 60 minutes later and one messy kitchen, ta daaa....

    Not my best work but not too shabby either. Mr Chris managed to snap this photo literally as I was running out the door.

    Usually I like to make everything myself but sometimes you just can't beat some of the cake toppers available. I spotted these little baby grows on ebay. They are printed on edible wafer card and I think they're pretty cute. 

    Wishing Lisa all the best as she heads off to become a Mum. I hope she enjoys these and takes it easy before the sleepless nights begin.

    BBQ Cheesecake

    No I haven't gone crazy and baked barbecue sauce into a cheesecake. 

    Today is probably the last barbecue we'll have this year and so to commiserate, I decided to make a tasty dessert to follow the meat feast.

    This is another recipe from the "The Hummingbird Bakery Cake Days" book, Butterscotch Pecan Cheesecake. Another first for me as I've never made a cheesecake but I'm happy with how it turned out. 

    Although tasty, perhaps a little too heavy following so much meat. Fortunately Mr Chris' family was on hand to help us struggle through it.

    Happy Heads Only

    These cupcakes are inspired by Tankerton and made in memory of a truly amazing person, my Mum. Today it will be seven years since she died but I won't be dwelling on that. Instead I will celebrate her life with my family and remember all the silly things we got up to.

    We have a bench at Tankerton sea front for my Mum. It was a place she loved to go, to walk the dogs, take us for fish and chips, or to get away from us when we would drive her crazy. This evening we all headed to the bench and kept our promise... "Happy Heads Only". 

    My Mum didn't want anyone to be miserable. She told us any time we had sad thoughts, we were to remember something silly that made us both laugh, and to hold on to it. It's not always that easy. There have been times when she has been very much needed and she is missed every day, but she taught us to be strong and left us with many happy memories.
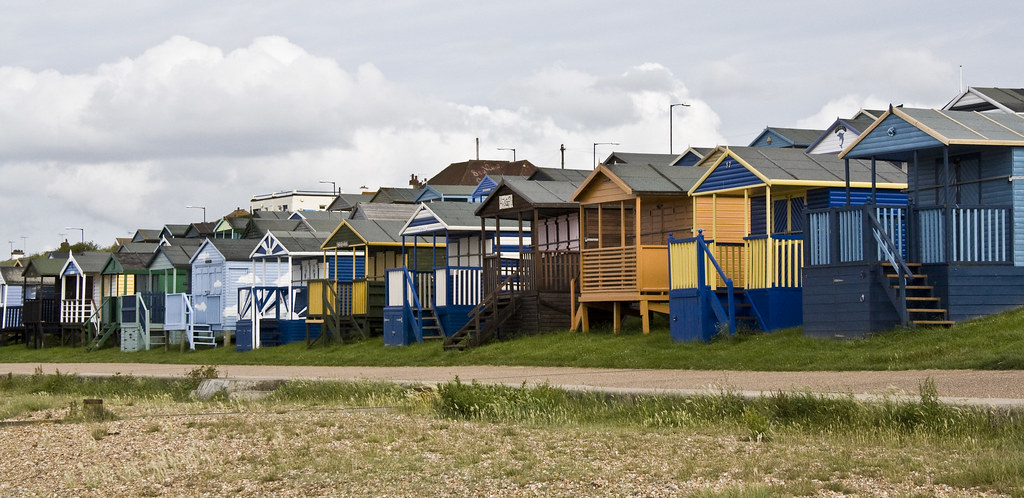
    Beach huts, ice-creams and wind turbines
    Funky coloured wind turbines :)
    I'm sure this evening would have made her smile. My family and I, dogs included, sat on the bench and had a good giggle. We laughed at my Dad who showed his age as he got cold and wrapped himself up in the dogs towel, and we stuffed our faces with chips and cakes whilst a fitness instructor shouted commands to a tired looking group of people just metres away. I'm sure the smell of our chips only helped to motivate them :)

    So here's to my Mum, Christine Thorn. I'm sending a huge hug to you today, and to Nan and to Lottie. Thank you for everything you did and still do for us. See you again one day, love you always xxxx

    Tankerton Beach Huts - photo by Mr Chris

    Gingerbread Cupcakes

    I've been looking for an excuse to make these and at last I have one... Lou's birthday... and these were on time (unlike her present which still sits on my dining room table).


    This is another recipe from "The Hummingbird Bakery Cake Days: Recipes to make every day special". 

    If you like Gingerbread you should like these, I think they could be one of my favourites. Although I have an urge to try one without the icing swimming in a big bowl of custard...mmmmm.


    A freebie for the boss

    I've worked with Grahame for a number of years and at various companies. He may have dropped me in it on occasion but overall he is a good person to work for, hence if he has a job going that's right for me I'll apply for it.

    Anyway, after bragging about my newly found cake skills I managed to foolishly volunteer myself to make a cake for his step sons birthday. I say foolishly because I only had a few days in which to do it and I already had a hectic week. Nevertheless, I did the best I could with the time I had.

    Can you tell what it is yet?


    Yes I think some parts could have been better but you can tell what it is right?

    I was so short on time Mr Chris actually carved and decorated the controller for me. I had to redo some bits but I think he did an amazing job and the cake wouldn't look complete without it. He is a life saver :)

    As the title suggests, I didn't charge for this cake but not because Grahame is one of my managers. In the time I've worked for him he has helped me through some pretty tough times and given me some sound advice, this was the least I could do to show my appreciation.
    Blogger Template by Clairvo