Sugarveil Cupcakes

When I started baking I owned an 8 inch round cake tin and a spatula. Two years later and I have two kitchen cupboards overflowing with various cake bits - cutters, piping tips, impression mats, stencils, modelling tools, petal dusts - and my collection is still growing.

My latest find was Sugarveil - a flexible icing used to create edible lace - and an opportunity to try it soon presented itself when my friend Steph asked if I could make some cupcakes for her Mums 50th birthday.

I was sceptical at first as they make it look really easy in the video but actually, it was. It creates a long strip of lace which I cut out and placed on to my cupcakes. I bought a fairly basic patten but there are lots to choose from. 

I created the "Mum" and "50" plagues a couple of days before the cupcakes so they had time to harden and stand up in the icing.

Whilst I was in a sugarveil moment, I also created a little batch of cupcakes for Chris' sister and brother-in-law as we still owed them a wedding gift. 

We'd been creating a wedding hamper of treats and these were hidden in the bottom to complete it.
My thanks to Steph whose baby hampers gave me the idea for the wedding hamper :)

Raising money for Macmillan and Cancer Research UK

Let me start this post by saying a huge well done to Zoe Drury and her fellow "blister sisters". What these ladies have achieved is incredible. After Zoe's mum was diagnosed with breast cancer in 2011, Zoe went on a mission to raise money for the charities that helped and supported her back to good health. Organising numerous fundraising events, from packing bags at the local supermarket, to climbing Ben Nevis, Zoe and her friends have raised over £10,000 for Macmillan and Cancer Research UK! Amazing! And that's where I come in....

One of their fund raising events was to host a charity ball and they asked if I could make a cake that could be added to their auction. I'm not a confident baker so I get nervous making cakes for people I don't know but as it was for charity, charities very close to my heart as my Mum and Nan both suffered with breast cancer, I really wanted to help.


The winning bid was from a lady needing a 60th birthday cake for her friend Paul. Sadly Paul had passed away weeks before his 60th but he had already begun organising his party, and his wife was continuing with it as he would have wished.


They sent me a picture of Paul wearing a tam o' shanter hat, the sort with the fake ginger hair, and asked if I could create a cake with a 60 on it and a figure of him wearing the hat. I created a two tier cake, with a 60th spray in the top and hopefully they were pleased with my figure of Paul. 


It was very nice to learn a little bit about Paul when I delivered the cake. He sounded like quite a character and apparently this was just one of many hats he chose to wear. I didn't deliver the cake to the party but I hope his wife and family were pleased with it, and I hope they had a lovely day celebrating his life and remembering good times.

Totoro Wedding Toppers

Cake toppers for a traditional wedding cake ;)

These little friends were created for Mr Chris' sister and his now brother-in-law. 

They let me off creating the cake as their wedding day was also my birthday, and as much as I love baking cakes I have been known to flap about them. 

Sculpting figures is one of my favourite parts of cake making, so I'm glad I got to do these and glad I could add a little something to their wedding. 


The cakes theme encompassed two of their favourite things that Chris and I also happen to love, Totoro and Snowboarding. 


So here's Mr and Mrs Miller in Totoro form...


... and their snowboards (modelled on Steve and Ruth's own boards) so they can hit the slopes after the wedding.


But hold on, aren't we missing a couple of Millers?


Of course not! A Totoro Connie and Totoro Kitty complete this little family.


Here they are in their final positions with the happy couple cutting the cake.
(I'm sorry I don't know who to credit for the cake)

It was a fantastic day, congratulations again Mr and Mrs Miller! xx


Posh Victoria Sponge

I had grand designs to create a standing lego storm trooper cake for Mr Chris' birthday this year, but a lack of time and no way to hide it from him put an end to that.

Instead I made his favourite, a Victoria Sponge, and dressed it up with plenty of whipped cream, fresh strawberries, chocolate dipped strawberries and little chocolate hearts. 


He was a little confused as I'd been telling him how much a challenge his cake was going to be but he was happy to get this instead. 

For what I consider a really easy cake I think this looks pretty smart. It vanished in record time too!

Easter Lemon Pavlova and little bunny bottoms

I love Mary Berry and I never miss an episode of the Great British Bake Off, so I was pleased as punch to catch their Easter Masterclass. 

I was planning to attempt Paul Hollywood's hot cross buns but opted for the Easter Lemon Pavlova after some hefty hints from my sister.

Mr Chris was brave enough to test my meringue. Well he was a little reluctant at first but the promise of a slice encouraged him to pose for a picture.


Yes, a little itsy bitsy teenie weenie part of me was hoping it would fall :)


In the middle and in each of the meringue nests is a mixture of whipped double cream and home made lemon curd. I don't have a picture of the lemon curd so you'll just have to trust me that it was good.

Chocolate mini eggs and candied lemon zest are added for decoration. Unless I did something wrong, the candied lemon zest really is just for decoration... yuk! This pavlova was so generous it managed to feed both our families. For dessert I whipped up some Easter cupcakes with dodgy coloured grass, more chocolate eggs, baby chicks and little bunny bottoms. These were for Chris' nieces really but they're only small so they needed our help to finish them.


Coffee & Walnut 60th Birthday Cake


Last year my Dad requested an elaborate Stairlift cake for his birthday. This year he made a simple request for his favourite coffee and walnut cake.

I've become a pro at the ol' coffee and walnut cake but it needed jazzing up to be good enough for my Dad's 60th. Hopefully I achieved this with a centre spray and an almost flawless finish on the coffee flavoured buttercream.


This is the first cake I have covered with buttercream and I think I prefer it to fondant. I still struggle with fondant on occasion. I promise I'm not working on commission but I followed another Krazy Kool Cakes tutorial to achieve these smooth sides and sharp edges...

It might not be the prettiest cake around but it's a mans cake. I don't think my Dad would appreciate flowers and butterflies. More importantly, it is his favourite.

Red Velvet Cupcakes


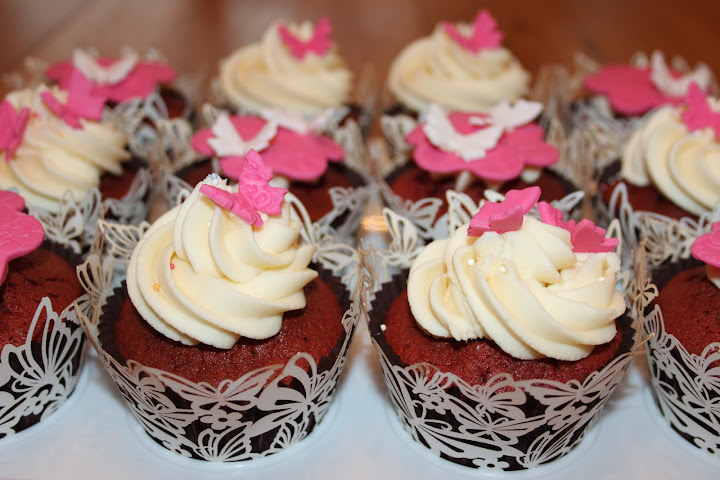
Red Velvet cupcakes with white chocolate buttercream frosting.

These were a naughty birthday treat for Nanny Maggie.

Red Velvet cupcakes are fast becoming one of my favourites, although mine never turn out particularly red.


I tried something a little different with the decorations. Cutting flower shapes from fondant and using impression mats to give them a bit of interest, and I found these pretty butterfly wrappers to complete the look.

Penguin Igloo Cake

Mr Steves has a fondness for penguins, a love of chocolate and a dislike for fondant. Hence a chocolatey penguin birthday cake where fondant only makes an appearance to cover the cake board and make the penguins features.


One of my favourite cakes to make and I'm sure it had nothing to do with all the left over marshmallows and chocolate ;)

I used a ball tin to bake the igloo, then covered it with white chocolate buttercream and added marshmallows one by one (one for the cake... one for me... one for the cake... one for me...) to make the icy bricks. 

The doorway was a bit of an after thought so sadly the penguins can't enter their tasty home.

The penguins themselves are cake pops and as my Owls have proved so popular, this time I decided to photograph how I make them....


The first step is to bake and crumble a cake.

I use a recipe for 12 cupcakes to bake a small sheet cake and this usually makes around 18 cake pops. 

To crumble, break the cake in to large pieces and rub them together.

When the cake is crumbled add buttercream icing one spoon at a time and use the back of the spoon to mix it in. It doesn't need a lot of icing, I find 1 1/2 - 2 spoonfuls usually does the trick.

When you have the right consistency the cake should stick together and mould easily. 


Take a little bit of mixture at a time and roll it into a ball. I use a tablespoon to scoop out roughly equally measures. Then place the balls in to the freezer for roughly 10 minutes to harden.

Remove the balls from the freezer and at this point you can stick with the ball shape, or remould them to your desired shape and place them back in to the freezer to harden again. For my penguins I remoulded them in to more of an oblong shape. 

Next is the fun bit. Melt your chocolate and start dipping :) 


At this point you would normally add a lolly pop stick but as I didn't need them I used fondue forks. To attach lolly pop sticks, dip the top of the stick in to the chocolate, then insert it gently in to the cake pop no more then half way. Do this for all your cake pops and by the time you come back to the first one it should have set.


Holding the lolly pop stick, dip the cake pop in to the melted chocolate until it is covered. Then lift it out and very gently tap to remove any excess chocolate. Don't be tempted to stir the cake pop in the chocolate as you may lose it from the stick. If your bowl is not deep enough to fully submerge the cake pop use a spoon to help cover it.

To create my penguins, I dipped them in white chocolate, then dipped the top and sides in milk chocolate once they had set.


For regular cake pops, I would add sprinkles and decorations while the chocolate is still wet. For my penguins I prefer to let the chocolate set before adding their features, otherwise they slide out of position and my penguins end up with wonky eyes and beaks by their feet.

I made their features out of fondant. To add them after the chocolate was set I used a cocktail stick to place a tiny spot of chocolate where needed which acted as my glue.

And that's it! I added butterfly decorations as bow ties, although Mr Chris questioned if penguins eat butterflies so perhaps they didn't have the desired effect. 

Don't be put off by the number of steps involved. Cake pops are easy and fun to make if you have the time. I learnt this technique flicking between videos by DessertDecorating and Bakerella so check them out if you want to see it in action.

Mr and Mrs Pointer

Many months ago my sister and I were talking cakes when she casually asked how much notice I need to make one. Completely oblivious to her sneakiness, I said maybe a week or two providing I have nothing on. So two weeks before the 3rd of January she asked if I would bake her a cake..... a wedding cake!!!

The 3rd of January last year was an entirely different and very difficult day. This year my sister and Steves wanted to start on a positive note by making it a special and happy day to remember, however they kept their plans to themselves. 

It came as quite a shock to family and friends, including my Dad, who arrived thinking they were going out for a meal but discovered they had been gathered for a wedding. After the initial cheer there was panic as friends debated if they had enough time to run in to town for a pretty dress, and uncles desperately borrowed from Steve's assortment of ghastly ties. Of course neither was necessary, but I am glad I got a little heads up due to my cake making skills. My only other duty was to ensure my Dad wore the new shirt and tie he had received for Christmas and thankfully he got the hint. 


To say this cake was stressful would have been an understatement! It had to be perfect and although it didn't compare to how beautiful my sister looked on the day, it was good enough for the restaurants manager to ask if I was looking for more work.

Once again I owe thanks to my mentor from afar, Krazy Kool Cakes, who had impeccable timing and posted a tutorial on How to Dam & Crumb Coat Cakes. Finally I know what causes that little bulge in my fondant where the cakes are sandwiched together and once again I can be generous with my fillings :)


One thing I couldn't find online was how to create the centre spray (probably because it really is that easy) but for anyone else looking, this is how I did it....


1. Cut shapes from thinly rolled gumpaste (I use fondant with added Tylo powder). Thin enough to look delicate and be light but thick enough to insert the wire.
I used an impression mat on one half of my fondant to give some butterflies texture and make them look more interesting.

2. Carefully insert wire in to the middle of the shape. Lightly pinch either side and guide the wire in so you can feel if it is getting to close to the surface. If you dip the end of the wire in a little water, it'll also help it to stick.


3. To give my butterflies shape, I lightly folded their wings and rested them in a left over Christmas card to harden overnight. You could use anything for this. I used the insert of a cupcake box for my other butterflies.


4. Get your hands on a posey pick and place a little piece of rolled up fondant inside to keep the wires in place.

5. Start adding the decorations. Cut the wires to different lengths and arrange until you're happy with how they look, then finally insert the spray in to the cake. 


Thank you to Think Cake in Maidstone who pointed me in the right direction on this one. If you live in my area I can highly recommend them, they stock everything you need, are very welcoming and happy to talk cakes and share their know how.


Despite a few drinks we managed to cut reasonable slices for the guests and I was pleased to find the top tier alone, a 7 inch madeira sponge, gave 21 slices. Harry had the right idea as he was first in line for his.


All that's left to say is how happy Chris and I were to share this special day with my sister and Mr Steves. It was a lovely day.


To Charlene & Steve,
You are great together and we wish you every happiness for the future, praying that all your dreams come true. Steve, thank you for making my sister so happy and taking good care of her. I love you both very much and I'm pleased to have you as my official brother-in-law (of course I will deny this if you ever mention it).
xxx


Princess Castle Cake

After Miss Connie Jean requested a Princess castle cake for her 5th birthday I feared she was starting to over estimate my baking skills, but perhaps she has more confidence in them then I do...

And maybe I cheated a little...

Originally I wanted to bake the turrets but as I lost track of what day it was over the Christmas period, I didn't leave myself enough time. The turrets are actually kitchen roll tubes covered in fondant. Not edible but quick, easy and they get the job done! I read somewhere that cakes can be baked in food tins so if you're making a castle cake and you would like edible turrets, maybe that's something to look in to?

The tops of my turrets are ice cream cones dipped in pink candy melts and covered with sprinkles (a whole pot of sprinkles). South Park shot glasses came in handy when leaving them to dry. I used the same glasses to squash the top of the kitchen roll allowing the cones to sit snugly, secured in place with a little buttercream. I was wise enough to make more cones then needed as two crumbled in the process.


A castle has to be high! This cake is three layers of madeira sponge sandwiched together with pink buttercream icing and jam. This is it with its pink crumb coat. For anyone unfamiliar with cake terms as I once was, the crumb coat is a very thin layer of icing that traps any loose crumbs, and helps to give a smooth surface before the applying the final layer of icing or fondant.


The slices were generous but expertly cut by Nanny Maggie one slice served two people. 


Ideally, I would have liked to add more finishing touches such as flags and a princess but I ran out of time. Nevertheless it got Connie's seal of approval and that's all that matters :)


Lottie, forever in our hearts xx

Charlotte Roses
We think about you always,
we talk about you still,
you have never been forgotten,
and you never will.
We hold you close within our hearts,
and there you will remain,
to walk with us throughout our lives
until we meet again.

Animal Safari Cake

When my friend and colleague, Azra, asked if I could make a birthday cake for her little boys 5th birthday party I was happy to oblige. When she went on to say she would need at least 30 slices from the cake and 30 cupcakes to accompany it, I have to admit I thought I'd bitten off more then I could chew.


Fortunately the cake was a success and probably my best to date!


As most of my cakes are gifts I've never had to worry about portions before, so the first thing I did was find out how many slices my usual 8 inch round cake provides.

Our friend Verity advised they got around 25 slices from Harry's 1st birthday cake, cutting it in to rectangular pieces like a wedding cake. This seemed to fit in with Wilton's serving guide and so I decided to follow that. 

I didn't want one large cake so I thought I'd attempt my first ever tiered cake. Using Wilton's guide I decided to go with a 6 and an 8 inch cake, until I got nervous about portions and the lady in the cake shop suggested I go with a 7 and 10 inch cake. 

It proved to be more then enough as all of the children and their parents got a reasonably sized slice, and they still had half of the bottom tier left at the end.


Stacking the cakes was a nerve racking experience but not as terrifying as I thought. There are numerous tutorials on YouTube, each one varies slightly and different people favour different types of supports. I opted for plastic dowels and pretty much followed this tutorial, placing four in my bottom tier. The cake felt sturdy and was delivered to it's destination with no dramas.


With an animal safari theme for his party, I created lots of little animal friends to match Ben's party invitation. These little critters took some time but were my favourite part of the cake and lots of fun to make.

I must point out the inspiration behind this cake comes from Krazy Kool Cakes in El Paso, Texas. They made an animal safari cake back in 2011. It was exactly what I had in mind for Ben's cake and when I saw it I knew I had to recreate it. If you haven't seen their work check them out on Facebook or YouTube. They're a family run business, their cakes are amazing and they always take time to reply to their fans! They're also very happy to share their expertise and often post helpful tutorials online.


As for the cupcakes, I managed to whip up 12 vanilla cupcakes, 12 chocolate cupcakes and 10 banana cupcakes to accompany the cake.

I created animal faces on the vanilla cupcakes but short on time I cheated with the others and added printed rice paper toppers. Not everyone is keen on fondant so at least it gave a good selection.


I'm very proud of this cake and even Laura from Krazy Kool Cakes gave it a big thumbs up. I hear it was a resounding success at the party and Ben had a really great day.
Blogger Template by Clairvo